Friday, January 25, 2013
Tuesday, January 15, 2013
Thursday, January 10, 2013
Wednesday, January 9, 2013
The wallpaper party goes disco
You know a party must be good when it lasts for two days. Yes, we're still talking about the wallpaper party. This is the last post on it until the day we decide to tackle the half bathroom.
Check out the double mirror action in these before shots.
We had to take the wallpaper party up a notch in here. Before we could start on the a paper we had to remove the light fixture, towel rods, and big mirror. We also chose to remove the sliding bathtub doors.
Here are the steps we took to remove the doors. Surprisingly simple.
Once everything was removed we partied with the wallpaper. The only spot we didn't get was behind the toilet. We left that excitement for another day.
Similar to the dining room, the wallpaper was applied directly to the drywall. It appears the previous owners had the wallpaper replaced at some point. The result is a very patchy wall. I'm concerned what it's going to look like when we paint...
And, done! We finished a bit earlier than anticipated and used the extra time to remove a few doors. The kitchen and master closet are now door-less.
Next project - floor refinishing! Alex hired some guys to take care of this while he is back in NYC.
Check out the double mirror action in these before shots.
![]() |
| Bathroom before (Realtor photo) |
We had to take the wallpaper party up a notch in here. Before we could start on the a paper we had to remove the light fixture, towel rods, and big mirror. We also chose to remove the sliding bathtub doors.
Here are the steps we took to remove the doors. Surprisingly simple.
- Removed each door by placing a hand on either side and gently lifting up and in.
- Lifted out the top piece of the door frame by removing the screws that attached it to the rest of the frame.
- Used a sharp utility blade to cut the caulk/epoxy between the door frame and tile/tub.
- Removed the screws attaching the door frame to the tile.
- Gently coaxed the three remaining frame pieces from the tub and tile. This sometimes required cutting the caulk/epoxy again.
- Scraped remaining epoxy from the tub and tile.
Here are a few pics of the action. As you can see, we have some follow-up work to complete. We plan on filling in the screw holes and resurfacing the tub.
Once everything was removed we partied with the wallpaper. The only spot we didn't get was behind the toilet. We left that excitement for another day.
Similar to the dining room, the wallpaper was applied directly to the drywall. It appears the previous owners had the wallpaper replaced at some point. The result is a very patchy wall. I'm concerned what it's going to look like when we paint...
And, done! We finished a bit earlier than anticipated and used the extra time to remove a few doors. The kitchen and master closet are now door-less.
Next project - floor refinishing! Alex hired some guys to take care of this while he is back in NYC.
Tuesday, January 8, 2013
Wallpaper Party
The wallpaper party contained so much excitement I couldn't get it all into one post. If you haven't already, read part one here.
After finishing up in the kitchen we moved on to the dining room.
The stripes in all their glory:
After stripping the stripes we quickly discovered the wallpaper was glued directly to the drywall. No primer, nothing. Ugh. It was definitely tougher to remove than in the kitchen but we adjusted our approach and knocked it out. Instead of scraping the adhesive layer (this damaged the drywall) we heated the "juice" and allowed it to thoroughly soak in before attempting to peel it away in large strips. We shouldn't have jumped the gun and scored before we stripped (hehe). The scoring marks made some of the adhesive layer a little more difficult to remove.
After:
Phew!
Bathroom stripping next.
After finishing up in the kitchen we moved on to the dining room.
The stripes in all their glory:
![]() |
| Dining room before (Realtor photo) |
After stripping the stripes we quickly discovered the wallpaper was glued directly to the drywall. No primer, nothing. Ugh. It was definitely tougher to remove than in the kitchen but we adjusted our approach and knocked it out. Instead of scraping the adhesive layer (this damaged the drywall) we heated the "juice" and allowed it to thoroughly soak in before attempting to peel it away in large strips. We shouldn't have jumped the gun and scored before we stripped (hehe). The scoring marks made some of the adhesive layer a little more difficult to remove.
After:
Phew!
Bathroom stripping next.
Sunday, December 30, 2012
To the windows, to the walls...
'Til paper come off those walls.
I have a bad habit of awkwardly quoting rap lyrics. Let's hope my family readers don't know the real lyrics I replaced. The last time I quoted this song I asked a classroom full of 9th grade boys what "ah skeet skeet skeet" meant. Yup. That happened.
Back to the point of this post. The previous owners of Sheridan wallpapered the kitchen, dining room, and two bathrooms. They were even thoughtful enough to leave us several extra rolls for each room in case...in case of what? I'm sure they put a lot of thought into picking out the perfect wallpaper but our decision to remove it took none.
Taking down wallpaper is a dreaded chore for many but we tried to make it fun. We even invited some friends to our wallpaper party but no one took us up on the generous offer. Not to fear - you all can join in the fun by reviewing our iPhone photos.
Six beers, five (hundred) songs, four slices of pizza, three rooms, two days, and a radio broadcasted Ravens game later and we were wallpaper free.
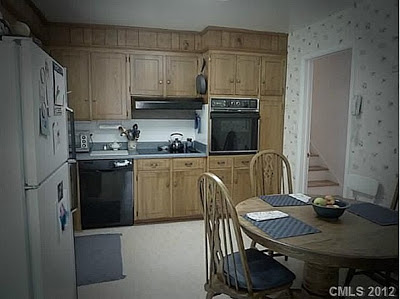
Let's take this room by room in the order that we worked. Kitchen first.
After some light internet research we decided on the scoring and hot water/fabric softener approach. It went something like this:
I have a bad habit of awkwardly quoting rap lyrics. Let's hope my family readers don't know the real lyrics I replaced. The last time I quoted this song I asked a classroom full of 9th grade boys what "ah skeet skeet skeet" meant. Yup. That happened.
Back to the point of this post. The previous owners of Sheridan wallpapered the kitchen, dining room, and two bathrooms. They were even thoughtful enough to leave us several extra rolls for each room in case...in case of what? I'm sure they put a lot of thought into picking out the perfect wallpaper but our decision to remove it took none.
Taking down wallpaper is a dreaded chore for many but we tried to make it fun. We even invited some friends to our wallpaper party but no one took us up on the generous offer. Not to fear - you all can join in the fun by reviewing our iPhone photos.
Six beers, five (hundred) songs, four slices of pizza, three rooms, two days, and a radio broadcasted Ravens game later and we were wallpaper free.
Let's take this room by room in the order that we worked. Kitchen first.
![]() |
| Kitchen before (Realtor photo) |
- Score the wallpaper using the Tiger (purchased at Home Depot)
- Apply hot water and fabric softener juice (that's what Alex kept calling it) using foam roller
- Wait a minute or two
- Peel off top layer of wallpaper
- Reapply "juice"
- Wait another minute or two
- Peel off adhesive layer, use scraper tool to assist
- Wash wall with warm soapy water
Dining room and bathroom photos to come in another post.
Project cost:
- Fabric Softener $5
- The Tiger (wallpaper scoring tool) $8
- Foam roller, bucket, paint pan $0 (already had on hand)
- Sponges $3
- Scrapers $5
- TOTAL: $21
Wednesday, December 26, 2012
Honey Do Me
We had the pleasure of spending 24+ hours trapped in a car together over the holidays. To pass the time we did nerdy things like listen to podcasts, eat broccoli (gotta love those Christmas dinner leftovers), sing Christmas carols, and make lists. Here are the house-related lists we created.
To do before we move in:
Refinish hardwood floors- completed 1/7!- Remove wallpaper x4 - 12/30 update - 3 rooms down!
Clean downstairs carpet- we decided a thorough vacuum is sufficient for nowRemove sliding bathroom doors- completed 12/30Fix outside drainage issue- completed 2/2 - post coming soon
To do within one month of moving in:
- Paint x14 - 2/10 update - 2 rooms, 1/2 the kitchen, and the front hallway complete!
- Doggy door (foreshadowing...)
Get lawn mower & weed whacker- Jill brought me hers on 1/20! Thanks, Jill & Adam!! (my sister and "little" brother-in-law- Front swing (gotta have something fun on the list!)
Subscribe to:
Posts (Atom)


